In today world there are many ways and places where you can set up your website. I want to show you step by step, how to make it on your own, and make it beautiful. No matter if you have a general portfolio, you are an architect or photographer who wants to show his photo albums – we will cover those cases by creating an attractive portfolio website for you.
Before we will proceed I want to show you examples of sites that we will create in this tutorial:
- Portfolio websites examples
- Photography websites examples
Creating portfolio website – Table of Contents
What will we need to set up your portfolio website?
There are few components that are needed for every website. We will list them here, and get to details later. Let’s learn the basics:
Domain
 Domain, or internet address, is what your visitors will enter in their browser to get to your website. For example
 johnsfoto.com could be your domain for your website.
Server
 A server is place on the web where all your websites files are located. It is just part of the hard disk that is dedicated for your site and that can be accessed by internet.
CMS
 CMS (Content Management System) is a piece of software that will make your life easier when you want to add/edit/remove content on your webpage. It is a better solution for most people then manually editing source code 😉
Theme
 The theme is responsible for that how your site looks(your website functionality & layout). The theme should be compatible with CMS that you have used for your website, to be useful.
Now that we have our definitions explained we can move on to details.

STEP 1: Preparing your web space: Domain, Server & CMS
First, we need to get you some server & domain so you will have the place to work on your new website. There are many hosting providers around the globe that offer services on many different levels. How to choose reliable hosting provider that will offer good server for reasonable price with quality support?
I will recommend for that Inmotion Hosting.

Choosing hosting plan
I have used Inmotion Hosting for some time as a home for my portfolio website, and I must say I was very pleased with it. What shocked me the most, that even, that server data center is located in the United States, it worked much better(faster) then my server located in Poland(Europe), that is more expensive than the one from Inmotion! Free domain(for the first year) and free SSL are other important features for new websites, that usually cost additional. They also support PHP 7.2 which mean that they care about keeping their software up to date on servers, and that is the huge plus.
To get your hosting & domain go to Inmotion Hosting page and choose one of their plans. What I can recommend is Power plan, but you should be fine with Launch plan, as you can always upgrade later if you need.

Installing CMS: WordPress
After choosing a hosting plan, you will have few options to choose for your hosting, like data center and dedicated IP. For Data Center I would recommend choosing the one that is closer to your target audience. Dedicated IP option depends very much on your situation and Inmotion delivers few examples when you might need it.
Next option is Content Management System Auto-Installer. This will help us a lot with speeding up the installation of our site and making our life a bit easier.
For Content Management System we will use WordPress, very popular free and open source software that powers 30% of most popular websites around the globe.
We are choosing WordPress also because of its huge community, thousands of extensions and because WordPress it is a very elastic solution. It is also available in almost any language – this can be a great advantage for beginners.

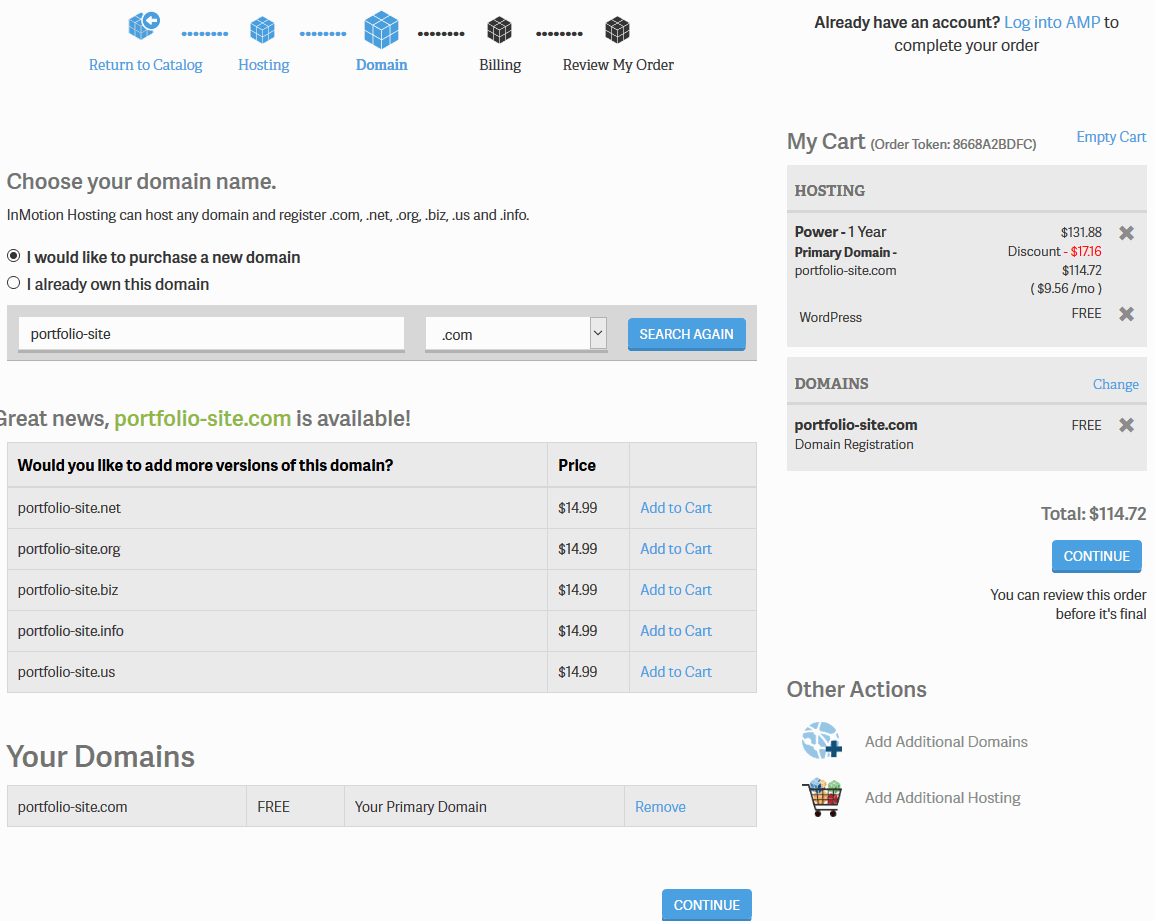
Choosing domain for your site
With the Inmotion current offer, you can choose 1 domain for free. You need a domain to represent your site with URL. Use the search field to look for available domains. It can be either your name, your company name or something else. You can also check out this small guide on selecting a good domain name.
A good domain name can help in positioning your portfolio website, but it is not necessary for good results. Most important will be content that is on your site.
If you already have a domain that you bought somewhere else you can also use it for your site.
For this example, I have used “portfolio-site.com” domain, as it was available at the time of writing this article.
In next step, you have the option to choose if you want to hide your contact information in public domain database(Whois Database). It all depends on your personal preference. If you don’t mind being contacted, then you don’t need this.

Finishing Hosting order
In next steps, you will create an account, review your order and pay for it.
The final bill was $114.72(at 11 June 2018) for yearly hosting with Power plan, free domain & free SSL certificate. I must say that is a great price for this quality.
But you can get it much cheaper than me, thanks to our partnership with Inmotion. By clicking here(or any previous link to Inmotion hosting site), you can get 40% off from regular price for any plan.

This means that you can get Power Plan for as low $5.39/month if you go for 3 years plan(around $194 in total). I wish I had such offer when building my site. At least now you can benefit from this. You pay less and I earn few $ for referring quality service at great price. Classic Win-Win situation!
Lets move on with our configuration.
Logging into your WordPress installation
After purchase, you will get an e-mail in which you will find login details to your WordPress installation. See below screen

Usually, your WordPress admin area can be found under your domain address with an appendix of /wp-admin, so it will look in our example like this “http://portfolio-site.com/wp-admin”.
So you should go there now and log in using data from mentioned above e-mail.

You can now check your new WordPress home by checking various menus in the admin area. However, before you will do any publishing thing we should do at least one more thing.
Adding SSL Certificate
What is SSL Certificate and why you need it? SSL certificate is small file that helps to protect your users(and your) privacy as it is part of encryption mechanism that protects anything that is requested or send by your visitor and server. This is important for various reasons: thanks to this no one can see what your visitor is doing on your website & what she/he type there. Also injecting malicious code into your website by someone in the middle is much harder. In general, it helps to protect whole communication between server and visitors.
In today world this is important for every site, no matter is it portfolio website, news blog or just simple CV. Not having this can hurt your Google score in search results.
SSL certificate is what is needed to serve your website via HTTPS(Hypertext Transfer Protocol Secure) instead of HTTP, so it will give you this famous green lock near the address.

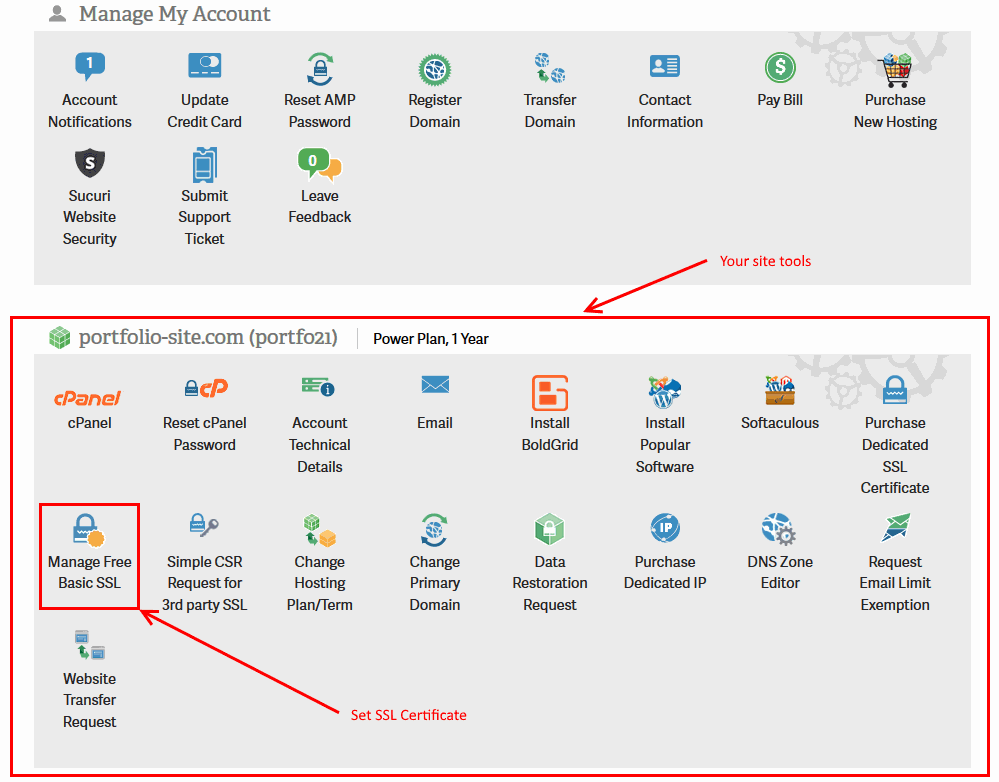
Inmotion Hosting gives you free basic SSL Certificate that is enough for a simple site that we aim to create. To activate it you will need to log in to your Inmotion AMP account that you have created while purchasing the hosting plan. In the e-mail with WordPress login data, there was also the part that asked to set your password for Inmotion AMP account. It can be accessed by https://secure1.inmotionhosting.com/index/login.
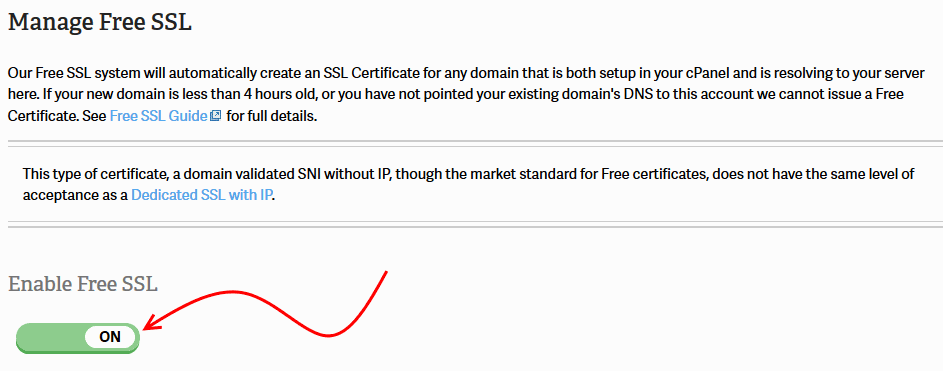
After you login there you should see your site tools and Manage Free Basic SSL link.
There you should use the switch to Enable Free SSL. This can take some time to activate, but you will get an e-mail confirming that this process is done. In my case, it took less than 10 minutes.
After SSL is activated the last step is to reconfigure your website to use https instead of http. You have to log in to your WordPress (in our case URL to admin area is http://portfolio-site.com/wp-admin ) and there go to Settings → General and there in WordPress Address(URL) & Site Address(URL) change http to https, and save settings.
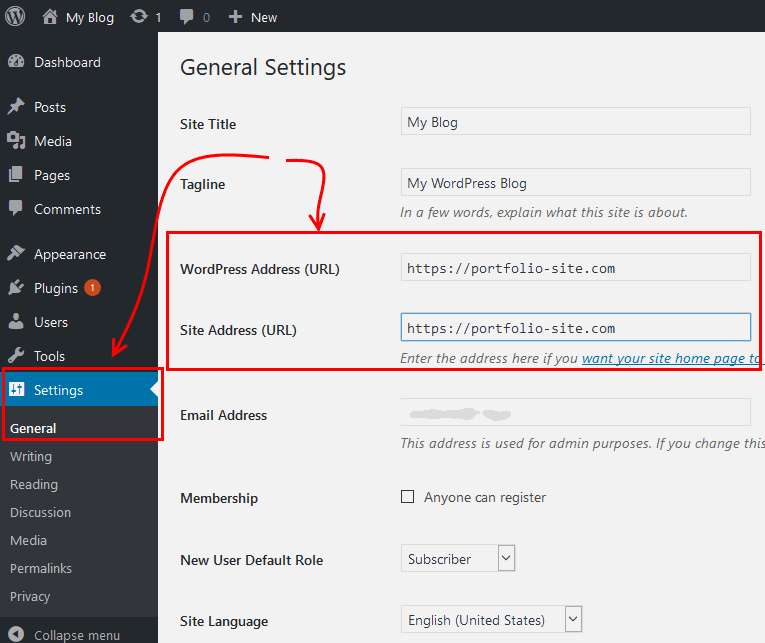
This will probably result in loging you out, as URL of your site will change. Your address should be now “https://yoursite.com/wp-admin”. So login again and check in the same place if settings have saved correctly.
Congratulation, we can now move on with making your portfolio website beautiful!
STEP 2: Theme – the look of your site
WordPress has literally thousands available themes, and most of them are available for free. There are also some premium themes, that are often extensions of their free versions. This means that Pro version can offer more features, more options & usually faster and deeper support, which is a very valuable thing in today world where there are so many moving parts.
In all those options what WordPress theme should you choose for the portfolio? Well, you can spend weeks choosing, installing and testing but you really don’t have time for this. You need to make your website a reality, not spend time on comparing and admiring others work.
For this beginners guide, we will use the Rife Free theme, as it is a very good solution for portfolio & photography needs. It has useful features that will help to make your portfolio website really pretty.
You can watch 4 minute movie showing process of setting up your site using Rife Free Theme:
Downloading & installing Rife Free Theme
First, you will need to go to Rife Free Theme page here and download theme using big blue Download button.

Next you have to login to your WordPress installation(that you have set up previously) and there go to Appearance Menu, and then while being in Themes use Add new button.

On next page use Upload Theme button – it will show form, in which you should choose the Rife Free theme that you have downloaded previously. Click Install Now.

After uploading is done you will have the option to activate theme – use it.
Great! You have installed and activated your WordPress theme 🙂
Making website beautiful – importing Design of Rife Theme
After you have activated theme you have 2 options: you can set up all theme settings to your best feeling or use ready Design from Rife Theme.
“Designs” are the ready set of options for Rife Theme with additional demo content designed to be beautiful and useful. It will also set up various things of WordPress like the front page, blog page, permalinks & menu, so you don’t need to worry about it from start.
As choosing colors, spacings & sizes are not trivial tasks, we will use those ready Designs as the base of your website, and then just simply change some settings and replace content.
Rife Free comes with 3 ready & very pretty Designs that you can choose from. Rife Pro has over a dozen other Designs that you can choose for your portfolio website. Don’t worry about it for now and let’s use one of Rife Free Designs, as you can always come back later and use Rife Pro Design once you master this process. If you want to make portfolio site, then the good choice will be Raven and for photography, it will be Cropps. So let’s proceed.
Go to Appearance Menu and next to Rife Free Import & Info. Next lets switch to Design Importer tab.
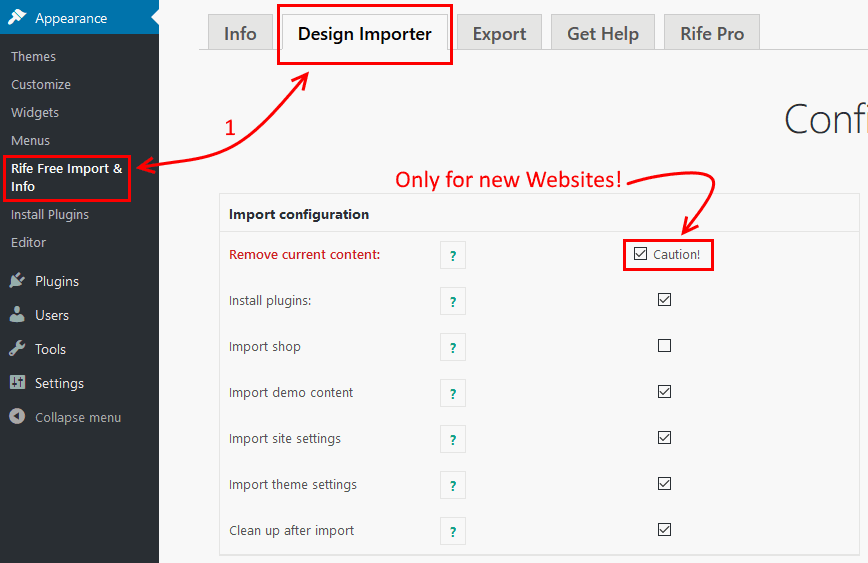
If you have fresh site, and you didn’t create any content yet, then you should select option Remove current content in Import configuration table – it will make sure that whole Design will be recreated without issues.
Next scroll a bit lower and choose desired Design by hovering it with the mouse cursor and click Import button. Confirm your decision in popup box and import process will begin. It can take up to few minutes, so go for a walk & and check what is going on behind the window.

After the import is done, you can check your website – it should look and work like Design that you have chosen. Hurray!

STEP 3: Personalize your portfolio website – getting into Customizer
Time to change some of the theme settings to make your website truly yours! For that, we will use native WordPress feature – Customizer.
Customizer is the panel for changing theme and site options with live preview for these changes. It means you will be able to see what particular setting changes without the need for publishing these changes. That is a huge help!
More info about Customizer can be found in Rife Theme documentation.
Get to Customizer
To get to Customizer do one of following:
- When you are in admin area go to Appearance Menu and next to Customize.

Choose the Customize - When you are on front-end of your website you can use the shortcut from admin bar by clicking Customize. It works only for logged in user.

Another way to Customize website
Change theme logo
When Customizer page will load, let’s start with changing the logo of your site by going to Header Settings → Logo.
You can use Text logo or Image logo. To choose one just switch Type setting in logo settings to the desired value.
If you want text logo you will have to fill out Text setting.
For image logo, you will be able to upload your logo image in Image setting. It is best to use an image that is not bigger than 200 x 75 pixels, but of course, other sizes will also fit well. Just be sure to upload an image that is few relatively small(few Kilobytes).
In case of Image logo, it is also a good idea to upload the version of the logo for HIGH DPI devices, like new smartphones. Otherwise, your normal logo can look pixelated or blurred on these devices.
Best way to prepare such image is to use 2 times bigger image of the logo then the normal logo. Most important, that image should have same proportions. So if you have uploaded normal logo in size 100 x 50 pixels, then in setting Image for HIGH DPI screen upload image 200 x 100 pixels.
More details about theme logo.
Change theme footer
Theme footer is often used for copyright info or any other additional links. Settings for it can be found in Customize → General settings → Footer.
You can decide to not use theme footer at all, and disable it in Footer setting. However, for now, let’s change default text in the footer by editing Content text setting. If you know HTML, you can use it in this field.

Add your social profiles
Other popular things to edit are social profiles links. They are used in few places in Rife Theme that you can enable/disable. For example, in Cropps Design they are used in theme header on the right.
To edit social services links go to Customize → General settings → Social settings. There you can add links and sort order of your socials by drag & drop. More about Social settings.

Add Favicon in WordPress
Favicon is a small icon that in old times where displayed in the address bar, there where you now see the green lock. In today browsers it is mostly displayed in tabs, to easily identify which website is opened in which tab.

Now that you know how useful it can be, it is a good idea to set it for your website. Go to Customize → Site Identity → Site Icon. WordPress advise you to use image 512 x 512 pixels in size, as it can be also used on mobile devices than to display quality shortcut icon.
You can also set there the title of your website that is also displayed in a browser tab.

Save changes in Customizer
After you are done with changes in theme options, you should save them. You can do it by using Publish button in the top of Customizer. Now your changes are available for everyone to see. High five!

An interesting thing is, that Customizer have the option to release your changes in future, for example, if you would like to plan ahead adding Christmas logo, and maybe changing some colors. It is nothing used on daily basis but just good to know about. More about it in the documentation.
Edit main menu
You probably don’t need every page added with Design import, so it is a good idea to clear your menu now.
Go back to the admin area, and then move to Appearance → Menus. Now let’s remove some links there.
If you used Cropps Design, for example, you will want to remove whole “Submenu” part, as it is there only to show how sub-menu behave in Rife Theme.
To remove them just open each link and click Remove at the bottom.

Same you can do with “Get Free” custom link, that leads back to Rife Free theme page. Remove any other links that you don’t plan to use.
Later when you will create some page, album or work that you will want to add to your menu, you can come back here and add it. Just word of warning, before you will be able to add albums & works, you will have to enable them as shown here.
Let us move on to making your content.

STEP 4: Creating your content
So with imported Design, you have saved your self a lot of time in creating and designing how content should look for your portfolio website. You can now just change demo content to your own or add a new one.
Managing Photo & Video albums
Let’s see how we can show up all your beautiful photos & videos using Rife Theme albums.
Best way to start, is to check existing examples, that you should have if you did full Design import from Rife Theme. For example, if you used Cropps Design then you will have ready Albums that can be found in Albums menu. There you will find the list of all albums that are already done. Open few of them in View mode & in Edit mode to see how are they made.

You can either replace content(photos/videos) in the desired album and use for your art, or just keep it for reference.
Creating new album
To create new album go to Albums menu and click Add New.
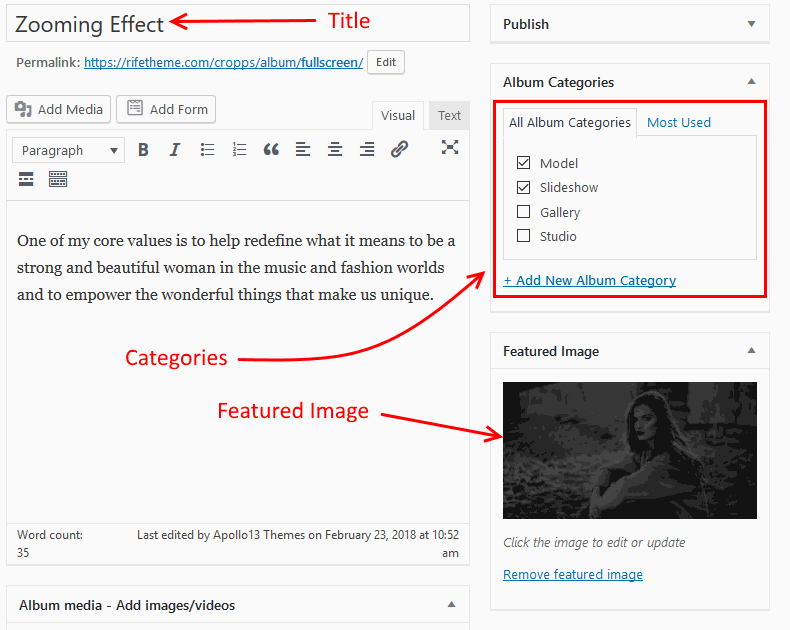
Next, you have to provide the title, featured image(an image that will represent your album on Albums list) and of course, add your images and/or videos.
You can also add album to category or few categories. This can be later used to for displaying albums only from one category.
To add your images click on Select/Upload images and videos button. It will open a popup with 2 tabs: Upload Files & Media Library.
If you want to upload new images or videos from your computer use Upload Files tab, and drag & drop as many files as you want.
If you have already some images in your media library you can select them one by one or in bulk.
To select 1 item just click on it and next click Insert Items button(bottom right corner). If you want to select more at once then you can use Ctrl(Cmd) or Shift key while selecting them with a mouse.
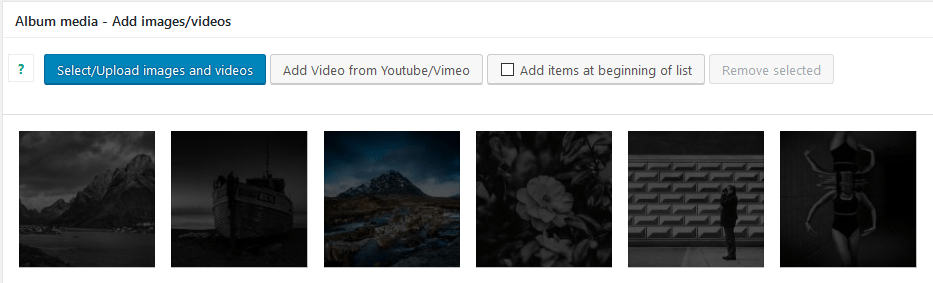
Videos added with above method will be delivered from your server. If however, you want to add video from YouTube or Vimeo use button Add Video from Youtube/Vimeo.
There you can add the link to this video and define few things like a thumb that represents video or should it autoplay.
Choosing type of album
When you have your images and videos added, it is time to decide how you wish to display your album. You have 4 ways to do it with additional variants:
- Bricks – in this layout you can arrange your items into columns, open photos to the lightbox, decide on should images be a various size or just in one proportion(for example 4:3). It is also the only layout in which you can add text content to whole your album, like in this example. Another cool example where some photos are 2 times bigger than others. Bricks layout is very customizable.
- Slider – it displays full-screen slider using your photos & videos. Photos can be either fully visible always, or cover the whole screen to not create “black bars”. You have also option to add Ken Burns Effect(aka Zooming) like here. It is also touch and mobile friendly.
- Scroller & Scroller Parallax(only in Rife Pro) – very pleasing effect of the horizontal scroller. It can be used in parallax mode or normal. Additionally, it can use cool effects for not active elements like for example blur here. On the same example you can see that opened photo(click again active photo) can be fully visible, or like on the previous example – cover the whole screen. It all depends on your needs. However, scroller is only for images, so if you plan to use videos, better use slider. Scroller is also mobile & touch friendly.
To select the type of album, go to Album details → Album Media → Present media in. After selecting your type, additional options will appear that you can set or leave in a default state.

More on Album options can be found in the documentation.
Filtering & tagging album
This is only for Bricks Albums. If you want to filter your album photos(see example) you can add tags to each photo/video by clicking the pencil icon to edit it.

It is a good solution for bigger albums with many items. In Rife Pro, there is also an option for mass tagging your album items.

Listing all your albums
If you plan to have more then one album that is probably a good idea to list them somewhere. That is why Albums list page exists. Details of setting up this page can be found in the documentation.
As you can see in this example, there is a filter that can be used to… filter albums 😉 and this is where categories added to album finally will be useful.
Categories of Albums can also be used to display only some Albums, for example, you could have a link to albums with models only, like here.
Making your own Blog
WordPress originally was made only for blogging, and many features like pages, support for custom post types(albums, works, people) or even option to create menus came much later. That is why among other things, WordPress by default give you option to have your own blog.
The blog is a very useful thing to have, as it is one of best and cheapest way to position your site as relevant in a sea of websites about similar topics. Of course, you have to use it to make it useful.
As you have imported Design from the Rife theme, you should already have configured your page for Blog. That is true for Cropps & Unicorn Designs. In Raven Design, that is a one-page site, you also have a Blog link in the menu, but it is an anchor(that will scroll the page to latest posts) instead of a traditional link, so let me guide you how to add “classic blog” link to the menu in this case.
Configuring your Blog Page
There are 2 ways that WordPress offers you to make your Blog Page: It can be your front-page or subpage. In case of making blog as front-page, it will be first that people will see when entering your site address. That is rather not desired effect for portfolio website, as much better would be to welcome visitor with your works or page about you. So I will explain second variant.
First, let’s check if you don’t have already created page for the blog. In admin area click on Pages and look for a page named for example “Blog” with mark “Post Page”. This mark means you already have a page dedicated for the blog. If you have found you can skip below section.

If you haven’t found such page, then we need an empty page, that will be used as representative for the blog page. So in admin area go to Pages → Add New. Name your page “Blog”, or as you like, and Publish the page.
Next, go to Settings → Reading → Your homepage displays and in Posts page: select created earlier “Blog” page, next save settings. From now on this page will list all your posts.

The last thing is to add this page to the menu if you want. Go to Appearance → Menus and find your new Blog Page and add it to Main menu(Site Navigation).
In the Rife theme, you have few layouts that affect how posts can be displayed on the Blog page. You can set them in Appearance → Customize → Blog Settings → Posts list → Post look and additionally set how many columns should your posts make and few other options that will affect visuals.
Adding New Post
After you have created your Blog page, adding posts is pretty easy. In admin area go to Posts → Add New. Choose title for your post, add nice featured image, categories, and prepare content. Of course creating valuable posts is whole other story, and art by itself, so I will not get into that.
Rife Theme come with few additional options for posts that you can find in metabox named Blog post details. If you want one of your posts to stand out more then others, you can use option Size of brick. As posts on Blog page are displayed in columns, this setting will give you the option to make this post take up 2 columns, if you set it to the value of 2. See below screen shots for example.


STEP 5: Where to look for help with WordPress?
When you are beginning your journey with a new thing, like WordPress, or new theme like Rife Theme, it is good to have someone that can help you with your questions or issues.
WordPress is very elastic CMS that have a lot of moving parts designed by many different people. Usually, they work fine together, but sometimes you can encounter some glitch. So where to look for help in such case?
General WordPress support
You can, for example, ask here in comments or e-mail us at info@apollo13themes.com and we will try to guide you to the solution, or place where someone will know more. We have over 8 years experience with WordPress so we have seen a lot during that time 😉
There is also other great help for general questions & issues in WordPress, that is official support forum that you can find here – just search topics for relevant questions or start your own topic.
Themes & Plugins support
If you have a Rife theme(theme described in this article) related questions you can get support for it also. For Rife Pro users, it is delivered via support forum, where staff will help you find right theme settings, explain how to set up your content in the desired way or even help with small theme customizations and solving plugin conflicts. More about it can be found in documentation.
For Rife Free there is support delivered directly by e-mail, contact form can be found here. This involves explaining features and pointing in right direction, so it is more basic support, but it still will come very handy.
As you have probably noted already there is also documentation for the Rife theme that should help as the first resource.
If you are using another theme, then it should also have its support. Just enter in Google “support for {Your theme name} theme WordPress” and you should find where to go.
With plugins it is exactly the same as with themes – they almost always have their dedicated staff that knows most about how plugin work in the tiniest details.
If anything you can always ask us 🙂
Other help
Always good first step is to google around or visit YouTube – there are thousands of tutorials on so many topics regarding WordPress ecosystem, that you should always find something that will bring you closer to the solution.
I hope that this tutorial was good kind of help and will help you proceed with your website, so you can share with the world what you have and who you are! if I have missed anything, you already know – comment below 🙂
High five!
P.S We used BomSymbols icons in our article
Very informative blog! Choosing a simple minimal photography template for your portfolio will help to keep the focus of visitor only on the gallery.
Thanks
Hi, I do already have a website at wordpress, however I would like to work on a rif wp theme / sample, for this website but without having my site down. Do I have to buy a name while I am working on the new theme?
Copy of e-mail reply that I have made to you:
Hey Magdalene:-)
Usually, in such case, you have to make a copy of your website and work there, until you are ready to move it.
This is how I would do it for my website for sure:-)
You could do it on a subdomain for example like beta.mkourti.com, if your hosting allows creating subdomains.
Or better staging server – you can work there, and with one click move all your changes to live site.
However, not every hosting provider offers staging feature.
With kind regards.